
- Level:
- Novice
- Lessons:
- 18 Lessons
Grouping Entries with Codex Categories
Take control of your growing Codex by organizing entries into custom groups and categories.
- Reading Time
- approx. 3 min
In the last lesson, we structured information inside each Codex entry with custom details. But as your Codex grows to dozens of characters and locations, even well-structured entries need grouping.
That’s where Codex categories come in. While an entry can only have one Type (it is either a Character or a Location), it can belong to as many categories as you like.
In this lesson, we’ll create a custom category and learn how to bundle our entries together.
Key Takeaways
- Categories group related Codex entries, regardless of type
- Codex entries can belong to multiple categories at once
- Two methods exist for adding entries to your Categories: tags and Codex details
Why Use Categories?
Categories help your Codex stay organized as it grows. Instead of scrolling through dozens of entries, you can collapse or expand groups based on what’s relevant to your current scene.
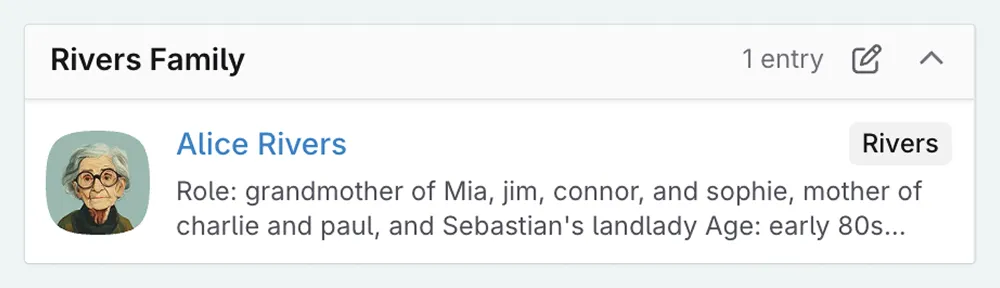
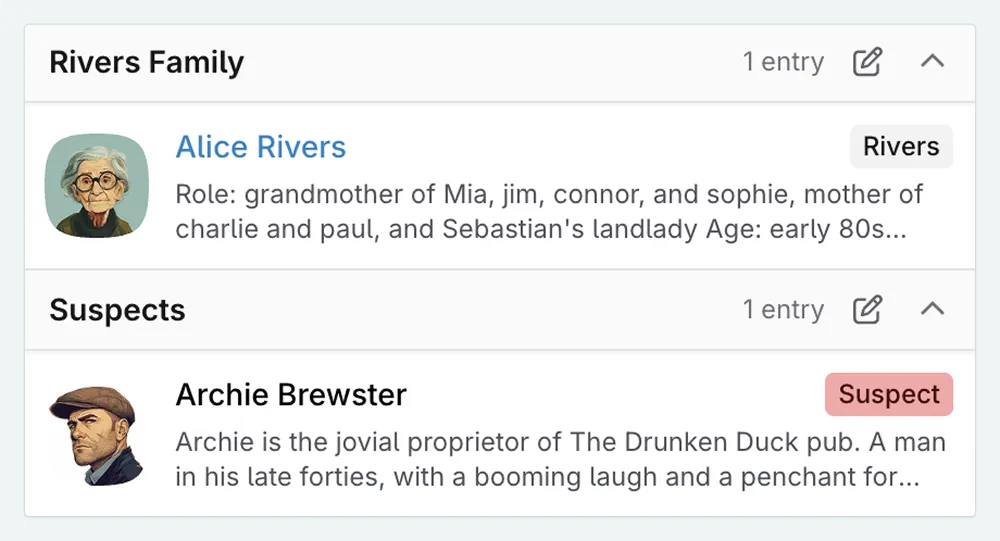
In my Cozy Mystery, I have a lot of village residents. When I’m writing a scene at the bakery, I don’t need to see the entries for the Rivers family cluttering up my sidebar. Categories let me minimize the entries until they’re needed.
If you use AI features, categories can be added to the message context, saving you from adding each entry manually. This is helpful for when you want to include the context of all of a group of entries. You might create Codex categories for:
- Family groups (“The Rivers Family”)
- Factions or organizations (“The Town Council,” “The Thieves’ Guild”)
- Location clusters (“Glenford Village,” “The Capital City”)
- Story arcs (“Murder Investigation,” “Romance Subplot”)
- Magic systems or technology (“Alchemy,” “Starship Components”)
Creating a Custom Category
Let’s create a category for the Rivers family. This group will include several characters, the family home, and some important backstory.
In the Codex sidebar, click on the ⚙ (cog) icon to open the Codex settings
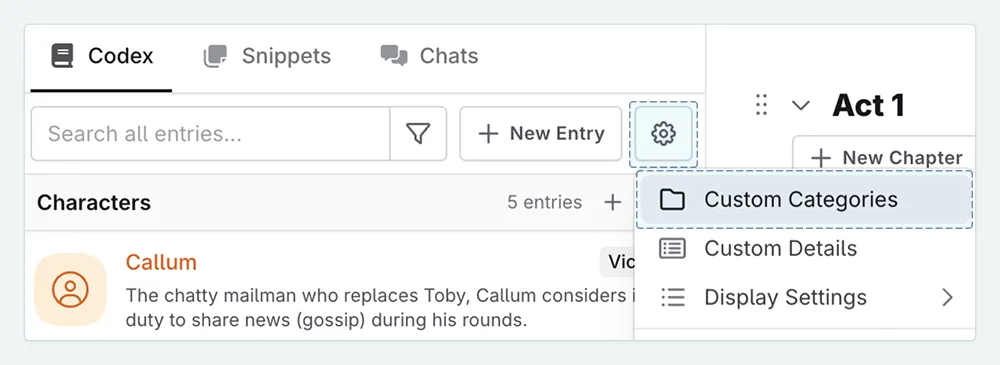
Click + New to create a new category
Fill in the category details:
A. Name: Give your category a clear name (e.g., “Rivers Family”)B. Color: Pick a color to help it stand out (optional)
C. Associated Tags: Enter the tag that will link entries to this category (e.g., “Rivers Family”), or set an associated custom detail.
D. Associated Types: Choose which entry types can appear in this category. Leave all selected if you’re unsure.
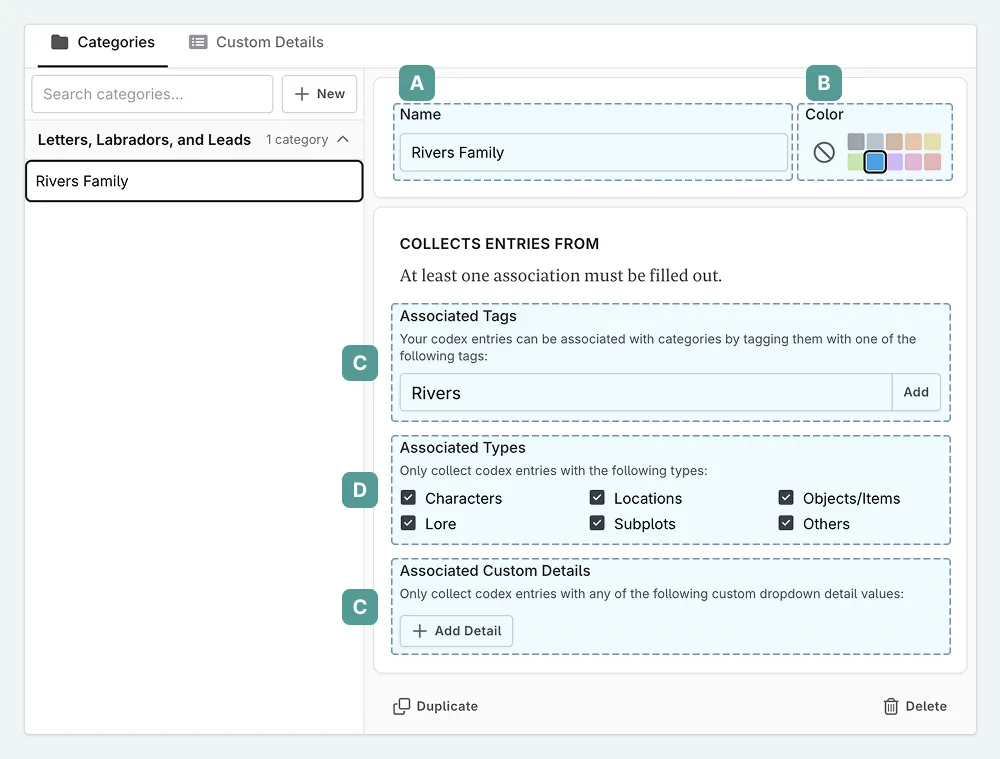
Your category is automatically saved
Adding Entries to a Category
You’ve created your category, now let’s populate it. There are two ways to add entries: Tags and Codex Details.
Method 1: Using Tags
This is the most straightforward approach. If, for example, you tag a character as “suspect,” Novelcrafter will automatically add them to a “Suspects” category set up to use that associated tag. To set this up:
- Open the Codex entry you want to add (e.g., “Margaret Rivers”)
- In the Tags section, type the tag you set for your category (e.g., “Rivers”)
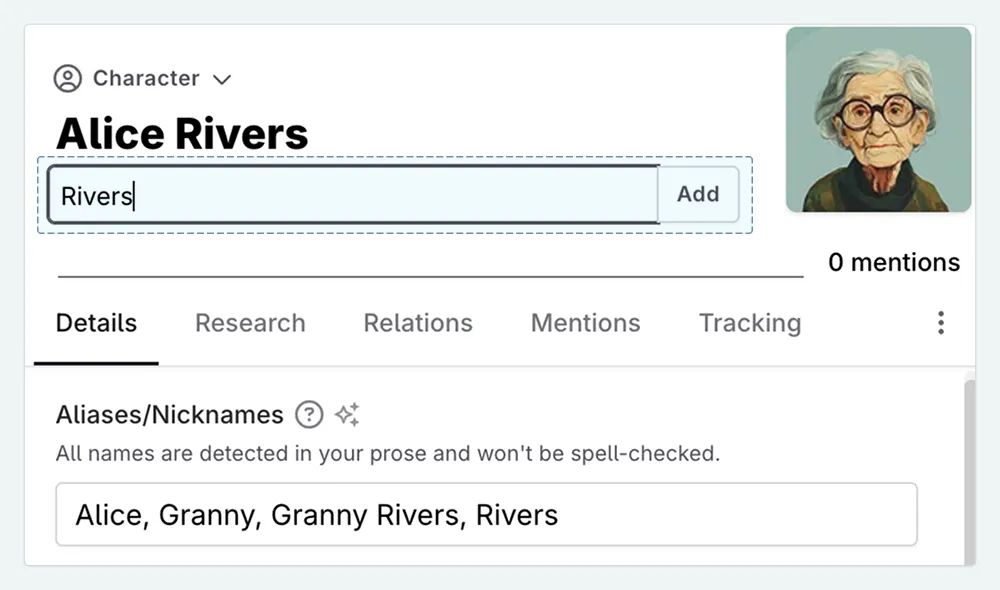
- The entry now appears in your custom category instead of the default type section
Repeat this for each entry you want to include.
Remember, entries can have multiple tags, so a single character could appear in both “Rivers Family” and “Town Council” categories.
Method 2: Using Codex Details
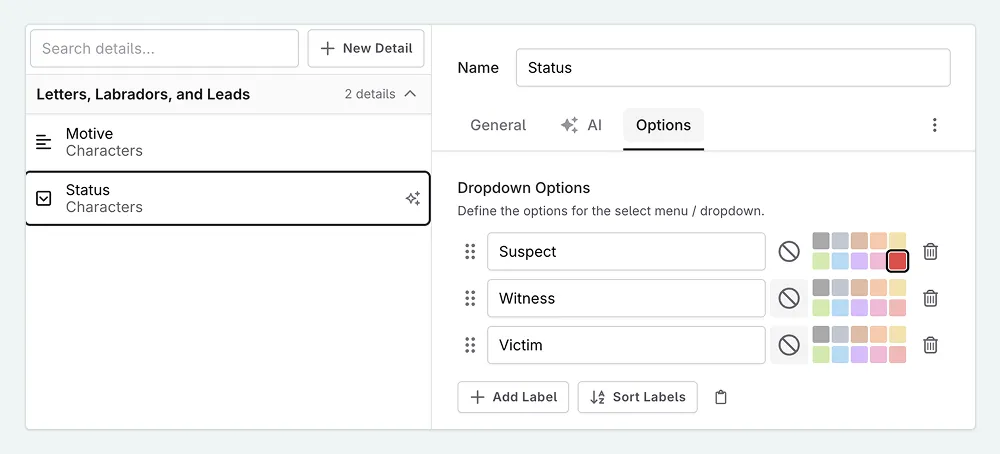
If you’ve set up Codex Details with dropdown options (as covered in the Structuring the Codex lesson), you can use these to automatically sort entries into categories.
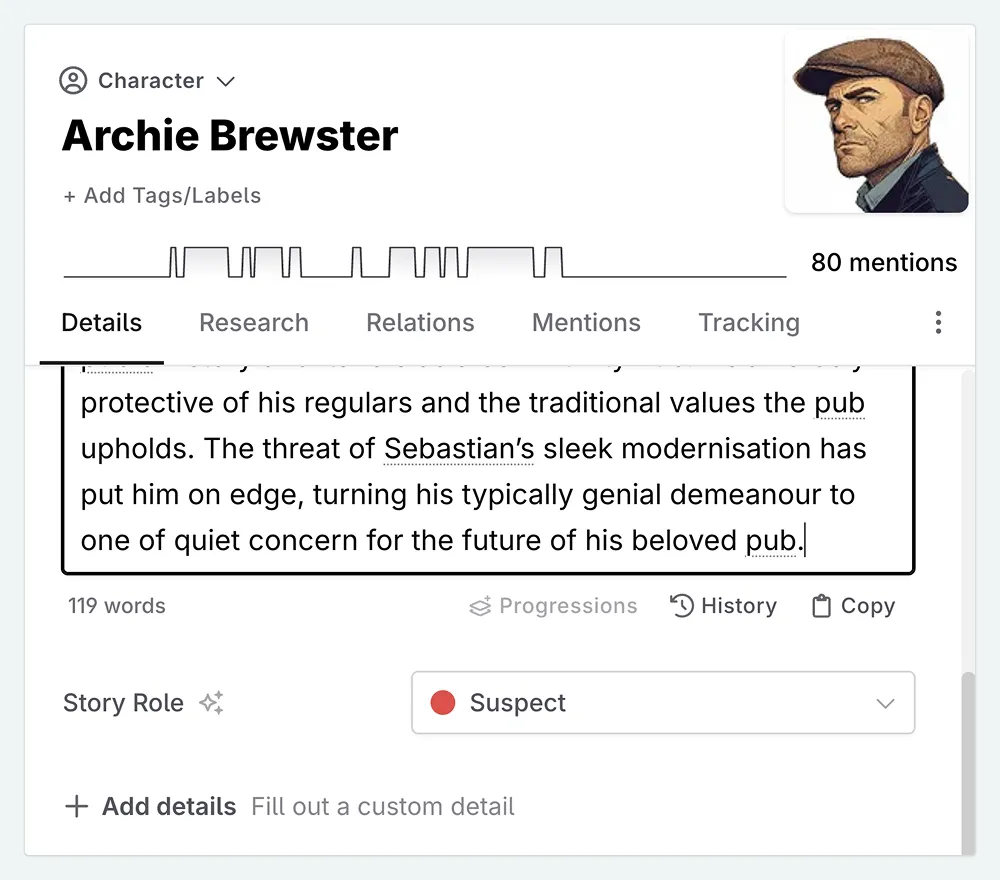
Say we have a Codex detail called “status”, which includes whether a person is a suspect, victim, or witness. We can set up a category for “Suspects” that automatically includes any entry with the “status” detail set to “suspect.”
- Go to Custom Categories in your settings and select your category
- Click Add Detail
- Select your Codex Detail (it needs to be a dropdown type) and choose the relevant option.
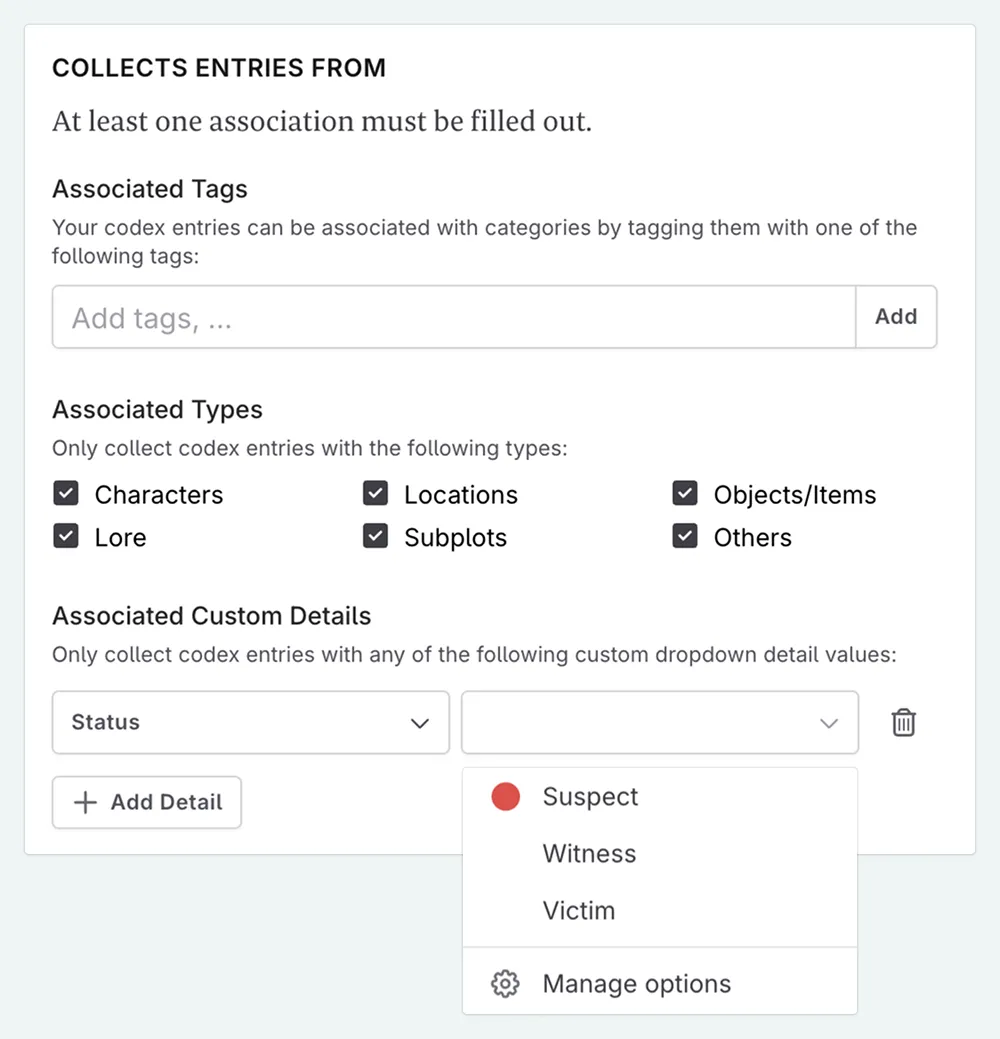
- Now, any entry with that Codex Detail value will automatically appear in the category.
Using Categories with AI
Beyond organization, Categories are useful when working with AI.
In previous lessons, we discussed Context (the information the AI “knows” when you talk to it). If you want to ask the AI a question about who might have committed the crime, you need to give it information about the suspects.
Without categories, you would have to manually select each suspect, one by one.
With categories, you can simply select Category: Suspects.
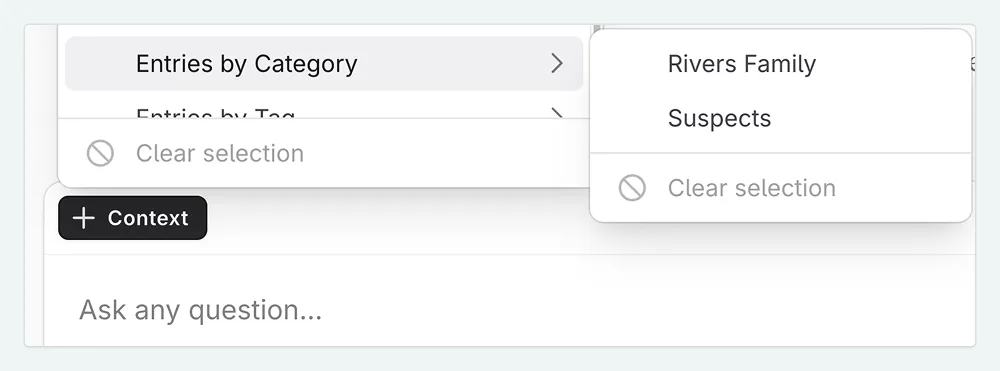
This sends all the information regarding those entries to the AI at once. If you add another relevant Codex entry later, you just tag them, and they are automatically included in your next chat.
Recap
You’ve now learned how to create custom categories, add entries using both Tags and Codex Details, and manage your categories as your story evolves.
This lesson was taught by:
Kate
Based in the UK, Kate has been writing since she was young, driven by a burning need to get the vivid tales in her head down on paper… or the computer screen.